 |
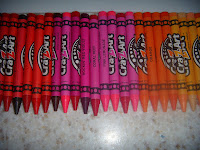
| My first attempt at crayon art. |
Harper's 3rd birthday is coming up and since I'm on vacation I should have lots of time to get all of my projects completed. Ha! Guess who else is on vacation...my two fabulous helpers. Today we worked on some crayon art for the upcoming Magical Rainbow Unicorn Party.
 |
| The almost birthday girl rocking her Christmas jammies in June. |
Here's how we made ours...
Harper's name covered.
Step 2: Line up the crayons in the order you'd like. I bought two boxes of 64 crayons. I have a bunch of brown and black left over.
Step 3: Attach crayons onto board/canvas. I used hot glue. It didn't take more than a single line across...although I did small sections at a time so that the glue wouldn't dry.
Step 4: Using a blow dryer on high, heat up crayons. I found that working on one color section at a time worked best. The crayon cooled halfway down the board if I moved on to a different color prior to the streaks reaching the bottom.
It took a while (like an hour). Since I had two helpers working their way to the middle, it went slightly faster. I excluded the time it took me to flip the circuit breaker after we blew the fuse (twice).


