Sunday, May 20, 2012

Adios Month of Fiestas

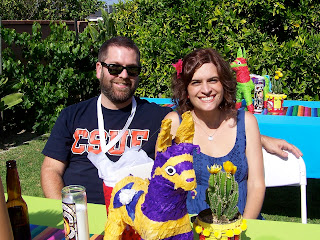
Could it be true?  Our fiesta season is done for 2012?  Sadly, the fiesta box went back into the garage until Cinco de Mayo, 2013 (if the world doesn't end in December, of course).  Here are some photo highlights from our celebrations!

Decorations


My mother-in-law made festively colored tablecloths which we topped with paper runners from Birthday Express.  The donkey pinatas came from a dulceria near my house.  $5 each!  
We planted cacti and succulents in cans with labels in Spanish and decorated with pom pom trim.  Other than my nephew eating the planting soil and then vomiting, it was a super easy project.  

 My sister made ruffled streamers in brought colors thanks to a tutorial from Dana Made It.  We also hung paper lanterns covered in crepe paper to look like pinatas (here's the tutorial... Urban Scarlet).

I adore these.  I collected wine bottle of the same size (by collecting I mean required my family to drink wine).  With some spray adhesive and ton of glitter, I made some glittery goodness. 


This vase was an Olvera Street purchase a few years ago.  

Another time I'm so excited to have talented friends and family!  Check out the super awesome candle Patrick Carrie whipped up.  I loved that as the night went on the light illuminated Matt's face.

Fiesta Napkins from the Dollar Tree.  Can't beat the price!

Food

We hired a taco cart to cater the food for the party.  No one had to stand around BBQ-ing hamburgers for hours on end, and it cut down on how much we needed to do ahead of time.  I added some additional things (like salad, fruit, and corn cake), but having someone cook ruled.  


Treats!  The pan dulce was yummy, even if it wasn't homemade.  Also pictured are Mexican ring cookies from All Recipes.  I took the tutorial for making pinata cookies and instead made star-shaped ones instead.  


I like cupcakes.  I like churros.  Why not have them together?  

 May I offer you some guacamole or salsa?  The printables came from Catch My Party Blog.

The party was muy bien.  Thanks everyone for your help and celebrating Matt's accomplishment!

Monday, May 14, 2012

A Fancy Nancy Soiree

We had the pleasure over the weekend of attending quite a fancy soiree in honor of my daughters' best friend's 4th birthday.  It was quite splendid (that's fancy for great).  If you aren't familiar with the Fancy Nancy books, she's a young girl who likes all things spectacular.  And when you're four, spectacular means over the top glam and glitter!

Happy 4th Birthday to one of my favorite kids, Miss Ella.  

Here are some of my absolute favorite elements of the party:

Dazzling Decor


The children's sized table was perfect for the pint-sized party attendees.  Each place was set with Fancy Nancy paper goods, a pink poodle (Nancy's poodle is named Frenchy), and a glittery butterfly placeholder.

The Eiffel Tower was great for photos and made you feel like you were reading Fancy Nancy and the Boy from Paris.  Spoiler Alert:  Nancy feels pretty silly when she finds out he's from Paris, Texas.  

Each chair was covered with a pink pillowcase (the seam was cut to allow it to fit perfectly over the little chairs) and decorated with wings.

Tulle cascaded in all directions from the patio cover.  It made the girls' space feel defined and extra special since it was theirs.

Ohh la la!  This was the grown-up cake!  The younger guests dined on cupcakes from the cupcake decorating bar and ice cream sundaes.

Elegant Ensembles

Party guests received purple boas, white lace umbrellas, gloves, and pink tutus.  The best part was that it didn't end there.  The party incorporated tons of fun crafts and activities for the fashionistas.  They decorated hats, made beaded bracelets, and on and on.  My craft-loving daughters were in heaven!

Beautiful hats ready to be fancified.  

Ummmm...divine?

Not to be outdone, Ethan suited up in a tuxedo onesie.

With such a glamorous outfit, the birthday girl needed a captivating coiffure (and a cookie).  The cousin of the mama happens to be in beauty school so she did hair and nails.

More fun photos from the party...

Wednesday, May 2, 2012

DIY Cascarones...Confetti Eggs

My favorite part of our school carnival (which was called Fiesta with Friends) was the cascarones, or confetti eggs.  Such a silly thing to sneak up behind your friends and crack a confetti-filled egg shell over their head, but it was insanely fun.  Probably because they spent the rest of the carnival picking confetti out of their hair.  Needless to say, I had to make them for our upcoming fiestas.

If you're not afraid of a mess, surprise your guests with these!

1.  Start with raw eggs.

2.  Drill a small hole in the eggs.  I tried to make sure my holes weren't larger than the top of the egg, but don't stress too much about the size as you'll be covering later.

3.  Drain eggs of whites and yolk.  Rinse out and let dry.

 4.  Next is the dying process.  If you've got Easter egg dye left over, use that.  If not, make your own dye.  I use 1 cup of water, 1 tablespoon vinegar, and 20 drops of food coloring.


 5.  Dunk eggs in dye until desired color is reached (the longer you leave eggs in, the darker they will be).


6.  Let eggs dry completely.


7.  Fill eggs with confetti.  I used the holes left in my 3-hole punch.  I filled the eggs about half-way.  Heck, if we are going to make a mess then I want to do it right.


8.  Using tissue paper, cut a circle slightly larger than your hole.  Then use your glue to attach tissue paper to egg.  !Bien!